REMEMBER:

•  Add your name to your projects
•  Save Photoshop projects as PSD and JPG
•  Save Bryce projects as BR7 and [Save Image As] JPG
•  Save Sculptris projects as SC1 and JPG and export it as an OBJ.
•  Save Rhino projects as 3DM and JPG
•  Save Flash projects as FLA and go to FILE>PUBLISH SETTINGS and publish as SWF and JPG
•  Upload finished projects to your portfolio and/or your DeviantArt page
•  Keep checking your grade on PowerSchool
DOWNLOADS:
Download Bryce 5 Trial Version
Download Sweet Home 3D
Download Rhino 3D 5.0 Trial Version
Download Sculptris
Download Windows Movie Maker 2.6
Download Java JDK
Download Greenfoot
Showing posts with label Stereo. Show all posts

Friday, October 18, 2013

3D Anaglyph from a 2D Image

If you've ever looked through a ViewMaster at a cartoon picture (i.e. Peanuts, Yogi Bear, etc.) you have seen a "3D" image which looks like it is created in layers.  These can be created by offsetting the green/blue in the background layer while leaving the foreground layer the same.

There are really two different approaches to this project:
  1. Using two separate pictures to create a foreground and background
  2. Using the same picture and separating objects from the foreground and background by making a copy of the image and erasing the background from the foreground image.
Example 1: Two Separate Pictures

In the example below, the Jellystone background was offset and the Yogi image was static -- making Yogi appear to be in front of the background (with red/cyan 3D glasses)
I began with these images:
 I pasted Yogi on to the Jellystone background and then removed the white background:
Next...
  1. Select the "backdrop" (Jellystone in this case) layer
  2. Select All (CTRL+A)
  3. Copy (CTRL+C)
  4. Select the CHANNELS tab
  5. Select the Blue and Green channels (click blue and then shift-click green)
  6. Paste (CTRL+V)
  7. Click the "channel visibility" box (where the eyeball should be) to show RGB channels
  8. Click the Move Tool (Black Arrow)
  9. Press the Right Arrow (on the keyboard) a few times to offset the blue/green from the rest
  10. Look at your image in 3D.
Note in this capture that the Blue and Green channels are selected but the "eyeball" is turned on for RGB.  That allows us to Move the Blue and Green channels while seeing all colors:

Example 2: One Picture into 3D

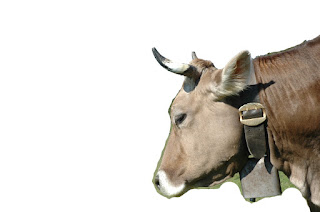
I wanted a picture that would demonstrate the difference between foreground and background -- and I found this cow:
Next I erased everything except the foreground.  Don't look too closely -- I did it as a quick example in class:
 
Next...
  1. Select the "backdrop" (hills in this case) layer
  2. Select All (CTRL+A)
  3. Copy (CTRL+C)
  4. Select the CHANNELS tab
  5. Select the Blue and Green channels (click blue and then shift-click green)
  6. Paste (CTRL+V)
  7. Click the "channel visibility" box (where the eyeball should be) to show RGB channels
  8. Click the Move Tool (Black Arrow)
  9. Press the Right Arrow (on the keyboard) a few times to offset the blue/green from the rest
  10. Look at your image in 3D.
Note in this capture that the Blue and Green channels are selected but the "eyeball" is turned on for RGB.  That allows us to Move the Blue and Green channels while seeing all colors:
Example 3: One Picture into 3 Layers

In this iconic image from Star Wars, I wanted to separate "layers" -- in this case, I wanted a background (the tunnel), a middle ground (Darth Vader) and a foreground (those pipes in the front).

The following pictures show the foreground, middleground, and background pictures that I used to create the final 3D image:
  1. I placed the foreground on the top layer (no channel offset at all)
  2. I placed the middleground in the middle layer (offsetting the green/blue channel a couple "clicks" to the right) 
  3. I placed the background behind the middleground and offset the green/blue channels several "clicks" to the right.
The final copy shows the 3 layers in anaglyph 3d:
Here are some other examples:

Thursday, October 17, 2013

3D Anaglyph Photography

Today we are going to be learning some simple "3D Anaglyph Photography" techniques.  To get a "3D" photograph you need to take a picture of a scene/object and then move the camera approximately 3 inches to the right and take another picture of the scene/object.  This simulates the way our eyes work (binocular vision) so each picture represents the view from one eye.  Then we will use the "Channels" in Photoshop to show both "eyes" in the same picture which is viewable with 3D glasses [red/blue or red/cyan].

Here are some 3D examples:


More recent uses of the 3D anaglyph process can be seen in NASA's Mars Rover program.  The rovers are equipped with binocular cameras -- two cameras mounted about the same distance apart as two human eyes -- and those images are processed to produce 3D anaglyph images and/or movies.
Here's an example of an anaglyph movie produced with this process:

If you have not taken your own set(s) of pictures (left and right), use some of these sample pictures to get you started (click them to view full-size then save to your computer and open in Photoshop):


Basic Instructions:
  • Open both images (left and right) in Photoshop
  • With your "Right" image open, Select > All (CTRL+A)
  • Do a Copy (CTRL+C)
  • Open/Select your "Left" image 
  • Select your "Channels" tab
  • Select the "Green" Channel
  • Hold Shift and click the "Blue" Channel
  • Paste (CTRL+V)
  • Select the "Red" Channel
  • Show the RGB Channel (click the "eyeball" -- don't actually click the layer)
  • Drag the image so your "focal point" is clear
  • Image > Crop
  • With 3D glasses on, nudge (arrows) your layer up, down, left or right to bring out the effect
This is an older tutorial video, but it still works: