REMEMBER:

•  Add your name to your projects
•  Save Photoshop projects as PSD and JPG
•  Save Bryce projects as BR7 and [Save Image As] JPG
•  Save Sculptris projects as SC1 and JPG and export it as an OBJ.
•  Save Rhino projects as 3DM and JPG
•  Save Flash projects as FLA and go to FILE>PUBLISH SETTINGS and publish as SWF and JPG
•  Upload finished projects to your portfolio and/or your DeviantArt page
•  Keep checking your grade on PowerSchool
DOWNLOADS:
Download Bryce 5 Trial Version
Download Sweet Home 3D
Download Rhino 3D 5.0 Trial Version
Download Sculptris
Download Windows Movie Maker 2.6
Download Java JDK
Download Greenfoot

Friday, February 28, 2014

Bryce: Buildings

Monday we will be creating some City Scapes using the Terrain Editing features we used before.  But today we will be making some individual buildings.

We are going to be using both PhotoShop and Bryce for this project.  We will create a grayscale image in PhotoShop (size 1024 x 1024 pixels) with a "bumpmap" of our building design.  Remember that the white is the highest point in the map while the black is the lowest point.  
So something like the following would resemble a pyramid:
Here are some examples of buildings used in a bryce scene:
The rounded building on the above-right image is an example of that.  Here are a few examples of "bump maps" that you can use for interesting buildings.


Wednesday, February 26, 2014

Personal Grade Slips: Due Today!

Today I am giving you a 2nd Semester Computer Projects grade slip.  I would like you to put your name and the period on top, then go through each of our assignments so far this semester and give yourself a grade.  Be honest with yourself.  Also indicate whether your project is on DeviantArt and/or Blogger.  Leave the "Teacher Grade" section empty because I will be grading your projects there.

THESE ARE DUE TODAY!
(Progress Reports get submitted tomorrow)

Bryce: 3D Logo

Today we're going to experiment with using Bryce Symmetrical Lattice to make a 3D logo.  On the right you can see the finished YouTube logo in 3D, while on the left (below) you can see the original.  I applied the logo to the Symmetrical Lattice.

I am also attaching a tutorial video (below) for those who would like to try this at home.

Here are some sample logo patterns -- however you should find (or create) your own:
Here are a couple different versions of a logo which you can use to create a "stained glass" effect.  The left image being the "glass" and the right image being the "lead" borders:
Basically I create the first shape (a symmetrical lattice) and then COPY it and PASTE the second shape directly on top of the first shape.  Then I just have to apply a new "bump map".  See below:
 Here's how it would look fully rendered in Bryce:

Monday, February 24, 2014

Bryce: A Winter / Snowman Scene

Today I would like you to create a scene in Bryce set in Winter and featuring a snowman and/or a snow globe.
  • Change the texture of the Plane (it starts out as a flat gray)
  • Adjust the sky / change the texture
  • Add some objects (trees, rocks, snow, or whatever)
When finished, make sure to:
  1. Save your document (FILE > SAVE AS > whatever.BR7)
  2. FULLY render your scene
  3. Save your image (FILE > SAVE IMAGE AS > whatever.JPG)
  4. Upload your project to your portfolio.
Be creative and have fun!

Friday, February 21, 2014

Bryce: Desert Scene

Today we are going to use our Terrain Editor, the sky editor, and some haze to make a scene that appears to be a desert.

I will also be including a video tutorial below for those who need to review the in-class lesson -- or for those who are absent during the demonstration.  Unfortunately, YouTube is blocked on our campus but I can download a copy of the tutorial if you need it.

Wednesday, February 19, 2014

Bryce: Forest Scene

Today we will be using the Bryce Terrain Editor to think a little bit outside the box.  We will be creating a forest by using the "terrain" tool.  In fact, we will be using a terrain for the ground, a terrain for the trees, and a terrain for some background mountains.  We will also include some fog, a variety of textures, some miscellaneous plants, and an effective sky.


I am also including a "video tutorial" below if you need to go over this again in the future.

Tuesday, February 18, 2014

Bryce: River Valley

Today we will use the Terrain Editor to build a river valley / canyon.  It will be similar in setup to the Island project from yesterday -- you will have a "mountain" (terrain), water, and a good sky texture. 

We will level out our terrain, apply spikes & mounds, and user a smaller brush with lower elevation levels to "cut in" a river valley.  Then we will add some "eroding" to make the scene more natural, followed by a little "noise" to make things less flat.

Remember to start out with FILE > NEW DOCUMENT > STANDARD > 800x600 (or 1024x768).

Thursday, February 13, 2014

Bryce: Lake / Pond Scene

Today we will use the Bryce Terrain editor to create a lake scene:
  • Insert a Terrain
  • Paint the entire Terrain with a dark gray (very low elevation)
  • Use the soft-edged, smaller brush on the lowest (black) elevation to paint a lake shape
  • Exit the Terrain editor (check mark) to view your new Terrain
  • Click EDIT and drag the Y Axis (Resize) down to flatten your terrain
  • Add a Water Plain and use the  Y Axis (Reposition) to move the water to the appropriate level (so that it shows inside your lake cut-out but doesn't cover the entire Terrain
  • Add finishing touches (additional Terrains for background, adjust textures, change your sky, etc.)
When finished:
  • Save As (as a .BR7 file) to your Thawspace
  • Render your picture
  • When finished Rendering, "Save Image As" and  select JPEG
  • Upload your JPEG to your portfolio blog

Wednesday, February 12, 2014

Register for Daz3D.com

Before we begin our project today, I would like you to take a minute to register for Daz3D.com.  We will "purchase" the software (even though it's currently free) because you will then have access to it later -- even if they raise the price again.
  • Click the link (above) and enter your information.
  • Check your email and click the verification link.
  • Log in to Daz3D.com (if you aren't already logged in)
  • Go to the ordering page for free 3D models and content and click "Add to Cart" (then close) for each of the software items you want.  I suggest "Daz Studio Pro 4.5".  Note: Bryce 7 Pro is currently $20, but if you keep an eye on sales, they sometimes "sell" it for free.
  • Go to your shopping cart (My Cart) and click "Checkout".  It's okay to add your personal information because we won't be paying for anything.
  • The total of your order should be $0.00.
  • Click "Place Order".
  • Click on "Available Downloads" to see what software you have available -- or any other things you have purchased.
You don't need to download anything here at school, but you can do so at home.  You now own all of that software.

Bryce: Island Scene

Today we will be using Bryce to create a basic island.  You will need to include some of the basics here including the flat plane, the "mountain" terrain, and water.  We will also be editing the "mountain", changing textures, and adjusting the sky/environment.  I will give some specific direction for this project in class.

SET UP BRYCE:

Go to: \\JHS-LAB-M16\Users\LabSoftware
Run: br_ap003_Bryce55

What I would like from you is the following:
  • Change the texture of the first Plane
  • Add a "Mountain" (Terrain)
    • Adjust it so it sinks slightly below the Plane
    • Edit the Terrain (click the "E")
      • Adjust the shape of the mountain
      • Add some Erosion
    • Change the texture of the Terrain
  • Add a Water Plane
    • Edit the texture of the Water
  • Change the Sky
    • Be creative and adjust fog, haze, colors, etc.
Also, if you would like to view a "video tutorial", I am including one below [if you can view the video inside the schools firewall].

Wednesday, February 5, 2014

Sculptris: Sea Creature

Today we are going to be using Sculptris to create a "Sea Creature" -- or some other thing that we can put into our "Under Water Scene" when we get to Bryce.  There's really no right or wrong way to do this assignment (other than, "Oh, look... it's a bubble."), so get creative.

You can see from the examples below that there were several different approaches to this project -- some went for real creatures and some went for fanciful.  Notice the first picture in the set has an underwater background.  That is achievable by changing your background picture in Sculptris.


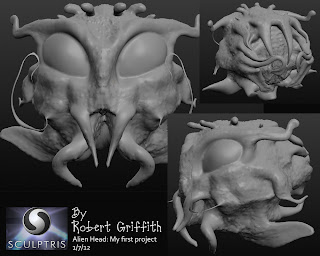
A student designed the following creepy creature in Sculptris...
Then put it in an under water scene in Bryce (another 3D program) later on.

IMPORTANT: I suggest saving regularly as Sculptris has a tendency to crash.  To do so, simply click the SAVE button (or do a CTRL+S) and save it to your Thawspace.  This will save it as a Sculpture file (.sc1).

When finished with your model, I would also like you to Export the file as an Object which we can use in other programs (such as Bryce).  To do so, simply click the EXPORT OBJ button (or do a CTRL+E) and save it to your Thawspace.  This will save it as a Wavefront (.obj) file.

Finally, I would like you to save an image of your file to include on your Blog Portfolio and your deviantART page.  Simply go to OPTIONS and then click on SAVE IMAGE and save it to your Thawspace.  This will save it as a PNG file.

So for each project you should have an SC1, an OBJ and a PNG file.

Monday, February 3, 2014

Sculptris: Head Design

In our last assignment we used a program called Sculptris to create a water creature which we will be importing into an underwater scene in Bryce later on.  Today we are going to continue exploring Sculptris by creating a 3D head.

Although we learned the basics of drawing a human head/face, we don't HAVE to make our creations human.  Be creative.

In these examples (right) I created an alien, a human, and an elf-like head.

Remember to:
  • Save the Sculptris file to your folder.
  • Save the image (PNG or JPG) file to your folder
    • Click OPTIONS > SAVE IMAGE
  • Upload your PNG/JPG file to your Blogger