• Add your name to your projects
• Save Photoshop projects as PSD and JPG
• Save Bryce projects as BR7 and [Save Image As] JPG
• Save Sculptris projects as SC1 and JPG and export it as an OBJ.
• Save Rhino projects as 3DM and JPG
• Save Flash projects as FLA and go to FILE>PUBLISH SETTINGS and publish as SWF and JPG
• Upload finished projects to your portfolio and/or your DeviantArt page
• Keep checking your grade on PowerSchool
Sculptris is an interesting approach to 3D model creation -- sculpting. Sculptris is a free program (download here) which helps you create models that you can import into other programs (like Bryce, for example).
Today we will be creating an organic shape with Sculptris. Mostly we will be exploring the different tools, settings, and options -- but you will be turning your project in.
Begin by opening the Sculptris application from your desktop.
When finished, you can save an image by clicking Options (I don't know why) and the Save Image.
Here's a video tutorial (not by me) for beginning Sculptris -- although I will demonstrate at least this much during class. I am providing it so students who are absent or need a refresher can watch again.
Next we will be attempting a head (monster, human, or otherwise).
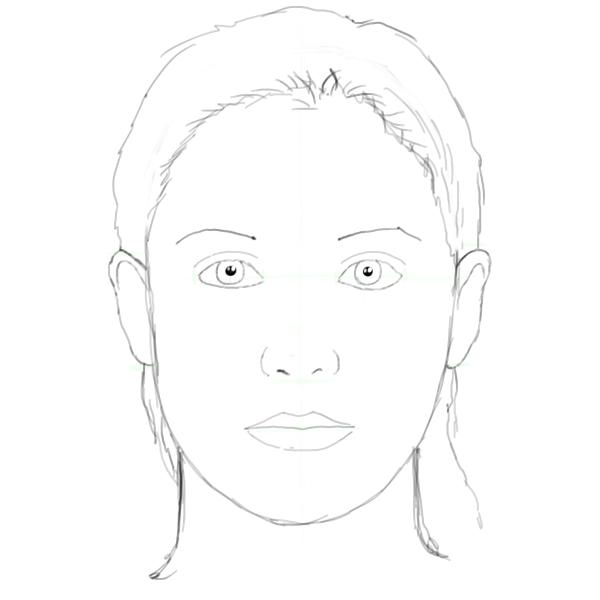
No, this isn't a drawing class -- but like the "Rule of Thirds" this technique can apply to many of our projects and designs. Almost everybody who draws a face draws them out of proportion -- usually by placing the eyes too high on the head.
Please follow along with my presentation on the whiteboard so you have a better understanding of facial structures before you begin working on the head in Sculptris.
Notice that if you look at the human skull and divide it into a 4x4 grid, the eyes are directly in the center of the face.
By applying that same division to a human face, we can see that the line appears right on the top of the eyeball in most faces.
You may also notice that the width of the eyes usually equal the distance between the eyes -- and really, on the sides of the face as well. This diagram shows 5 eye widths on the face.
Another interesting observation is that the center of the eye roughly lines up with the edges of the mouth, and the edges of the nose generally line up with the inside corners of the eye.
Notice in the finished drawing that the same line (now invisible) that ran across the top of the eyes also indicates where the ear joins the head. Also notice that the eyebrows are not directly centered above the eyes.
You should keep these lines in mind if your figure is not looking directly at you. Also remember that the head is really skull-shaped with "attachments" (nose, lips, hair, etc.).
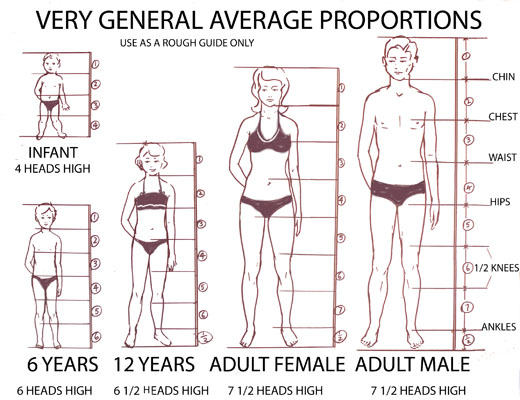
While we are on the subject of proportions, this is an interesting general diagram showing human [male] body proportions. Notice that "one head" is the unit of measure. At the "second head" the line intersects the models chest -- at the 3rd, across the top of his naval... etc.
And this "sewing guideline" chart shows a few variations to the original.
Finally, here's a video demonstrating the facial proportions:
Today we are going to begin putting all of the different techniques together into an Interactive Story Book (similar to the Multimedia Greeting Card but with additional "scenes"). You can come up with an original story or find one that is in the public domain or retell an old fairy tale story in your own words. Each "scene" will have words, images, and interactivity (mousing over and/or clicking to make something happen).
Some ideas might include a children's story with pictures of your little brother/sister/nephew/niece, a story or poem you have written which you can illustrate in Flash, an educational book (i.e. anatomy, astronomy, chemistry, welding, etc.), or a tutorial / how-to involving step-by-step instructions.
Try to make this a project which is different than a simple "click for the next page" movie -- we could use PowerPoint to do that. Include something like a button with an "over" or "down" that makes the movie interactive. Maybe insert a movie clip on one of your frames that animates something. Just be creative!
You should include the following:
A custom mouse pointer
An opening "scene" which stops at a specific keyframe or loops back to the beginning.
A button which will advance the viewer to the next "scene"
A "stop" on the next scene so users can view everything
A button which will allow users to move to the next scene(s) and a "stop" button
On the last frame of the last scene, a button which will allow users to start over from the first scene
Create a new document: FILE > NEW > Flash File (ActionScript 2.0)
Create 3 Layers: Pointer, Buttons, and Background
On the background layer, draw a background
On the pointer layer, draw a pointer
Select the pointer background layer (it will select the pointer)
Click Modify > Convert to Symbol > Movie Clip (name it Pointer)
Right-click the pointer symbol and select "Actions"
Enter the following ActionScript:
onClipEvent (load) {
Mouse.hide();
startDrag(this, true);
}
onClipEvent(mouseMove){
updateAfterEvent();
}
Press CTRL+ENTER to test your movie
Draw a button
Convert the button to a symbol (a button, obviously)
Go out to Frame 10 (for example) and add a keyframe for each layer.
Draw a new "scene" on Frame 10
Right-click the first keyframe on any layer (black dot) and choose Actions
Enter the following ActionScript: stop();
Right-click any layers last keyframe and choose Actions
Enter the following ActionScript: stop();
Right-click the button and enter the following ActionScript (if you set the next scenes keyframe at 10):
on (release) {
gotoAndPlay(10);
}
Test your movie (CTRL+ENTER)
Once your movie is working (i.e. It opens and stays until you click the button -- and then it goes to the next section and stays) you can begin adding some flair. Add sound effects, improve your mouse pointer, insert some music, insert pictures, etc.
Note: I created a template for the Interactive Book (below) if you feel like you need to start with it.
Today we're going to be making a "Multimedia Greeting Card" in Adobe Flash. The idea is that we will have a scene playing with a button that will take readers to the next scene. When they click and open the next scene, there will be a button to close the card (and return to the main scene).
Requirements:
Custom Mouse Pointer
Card Cover (stops for button click)
Card Inside (stops for button click)
Buttons that change on "mouseover"
Some sort of animated element (i.e. a movie clip that plays on one of the pages)
There are a couple codes that you can use for this:
If you remember from before Winter Break, your homework was to come up with an original story which you will illustrate in Flash upon your return. We will be adding interactivity, sound, etc. We will begin this story next Wednesday and complete it for your Final.
As a reminder, this was the instruction:
Begin with a Story Map:
The Setting
Characters: Tell who is in the story
Place: Tell where the story takes place
Time: Tell when the story happens
The Problem
One or more of the characters has a difficulty. What is their difficulty or problem.
The Goal
One or more of the characters has a goal -- something they need or want to happen. Usually this goes along with the problem.
The Events
Event 1, 2, 3 -- Things that happen in the story that tell how the characters get from the problem and goal to the end of the story.
The Ending
What happened at the end of the story? Tells how the characters achieved their goal and resolved their problem.
Use the instructions below to create a few different 3D buttons. They should either be different colors or change to different colors when being "moused over". You might want to try round *and* square buttons using the same technique.
Do a search for "Sound Effects" and "WAV files" so you can add some sound to your buttons. Here are some examples:
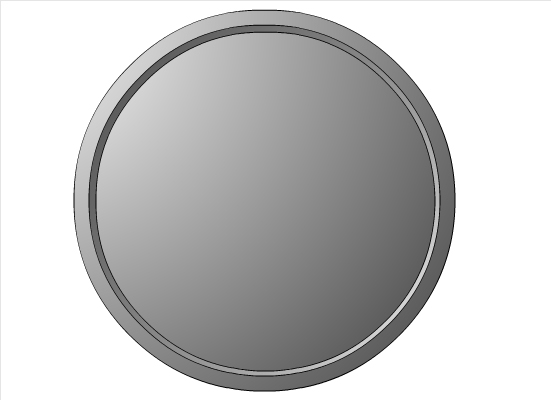
If you want to do some 3D-like shapes, you can do so with a gradient fill and ovals [or rectangles].
First we create a basic shape.
Next we Fill the shape with a gradient in the top-left corner. Notice how it appears rounded or concave.
Then we create a smaller circle and fill it with a gradient in the bottom-right corner. Notice the way it looks "inverted concave" now.
Create another circle (smaller than the second) and fill it with a gradient in the top-left again. Now it appears to be a rounded button with a "frame".
Adding a color gradient (green for example)...
and then painting on a little white for reflection makes it a little more "glassy".
Next you select the entire shape and Convert To Symbol, choosing "Button" as your symbol type.
Your button will appear as a single piece with a bright blue border around it.
Double-click your new symbol and you will see the "button instances".
Here you can see the Up, Over, Down, and Hit instances.
The full screen appears like this.
You can right-click on each of the instances (Over, Down and Hit) to INSERT KEYFRAME. This will copy the Up keyframe so you can start with the same shape and placement.
Change each "instance" to reflect a different look.
When you do a CTRL+ENTER it creates an SWF wherever you have your file saved and previews the "movie" on top of your Flash window.
Today we are going to be drawing an eye (facing left), converting it to a movie clip, dragging an instance to the desktop, naming your instances, adding some ActionScript, and testing it. The result? Eyes that follow the mouse pointer, obviously. :)
Create a Flash ActionScript 2.0 file.
Create three layers (Actions, Eyes, and Content).
Add the following ActionScript to Frame 1 of the Actions layer:
a = eye1._y-_ymouse; b = eye1._x-_xmouse; angleA = Math.atan2(a, b); degrees = angleA/(Math.PI/180); setProperty("eye1", _rotation, degrees);
We have colored in line art in Photoshop and manually traced an image to create line art in Flash. Today we will be learning the MODIFY > BITMAP > TRACE BITMAP function in Flash. Basically what it does is convert a bitmap/raster graphic (i.e. a photograph) into a vector graphic automatically -- or at least with very little effort.
Typically I begin by either importing the graphic to my stage or pasting the graphic onto my stage. Then I go to Modify > Document and change the Document Properties to match the Contents. All that does is makes my "stage" the same size as the picture on the stage.
I also give it a Title (and sometimes a description) at this point as well. You will also notice the Frame rate -- which is something we will be using later when we get to animation.
Next I go to the Modify > Bitmap > Trace Bitmap menu so I can trace my image. Here I can adjust the color threshold (smaller numbers are more detailed) and the minimum area (again, smaller numbers give higher detail). You can also adjust your Curve fit or the Corner threshold to smooth the graphics out.
I used various settings on this example image to get more or less detail and to smooth out what I have.
In the Eagle example I traced the outline by hand with a black paintbrush, but did a "Modify > Bitmap > Trace Bitmap" to pull out some feather details. I also added in some of my own details (using the paintbrush) to make it appear more hand drawn.
Finally I traced a flag using the Trace Bitmap option and placed it behind the Eagle.
Because this project can be done in a number of seconds, what I want you to do is create several different images using different settings and then choose two good example to upload to your portfolio.
The "Trace an Image" project really helps build skills with the drawing tools and gives us a good baseline for future projects. Here are the steps I recommend for getting started:
Open Flash and create new document (either ActionScript 2.0 or 3.0)
Open an Internet browser and find a picture that you would like to copy. Although cartoons and line art drawings are easier, I recommend starting with a photo and seeing what effects you can get.
Copy the picture (Right-Click and select Copy)
Open Flash and Paste your image (Right-Click and select Paste)
Go to Modify > Document
Click on "Contents" and click "OK"
Press CTRL+2 to fill the screen with the largest size possible
Create a new layer (the little square "folded corner" icon under your layers
Begin tracing your image
When completely finished tracing your project, delete your original photo layer. Note: You can temporarily "hide" your original photo by clicking to dot under the eyeball on the layer holding the original photo.
Save your completed file to your Thawspace
Press CTRL+ENTER to test your finished project (this also creates an SWF file)
I would like you to spend today and Friday creating these traced images. If you complete one quickly, do another one. You can use these in another project in a few days.
Examples of Traced Images:
In this example, I traced the outline of Charlie Chaplin and cleaned up some edges. I also took the liberty of adjusting the hair color and adding some details to the coat that weren't in the original picture.
In these two examples of Eagles, I replaced the dark brown background with a sky and a flag, respectively. The point is that you can trace an image and still have fun with the design.