
Thursday, May 29, 2014
Wednesday, May 28, 2014
Photo Story 3: A Portfolio Slideshow / Demo Reel

You can select numerous photographs [in order if you prefer], add background music, narrate your slideshow, etc. If you don't have music of your own, Photo Story has a build in "music creator" which will fit a variety of "moods".
Today we are going to create a slideshow using pictures of our projects from our portfolio's. These include Photoshop, Bryce, Rhino, Sweet Home 3D, etc. You can also include screen shots of HTML or Flash, or even your other creations (welding, woodwork, paintings, etc.).
To create a Photo Story 3 project:

- Launch the Photo Story 3 application
- Check "Begin a new story" and click "Next"
- Click "Import Pictures"
- Select the pictures you would like to use in your project and click "Ok"
- Click "Next"
- If you don't wish to add titles/comments to your pictures, click "Next"
- If you don't want to record narration, click "Next"
- Click "Select Music" and choose the MP3 file you want to use for your background music
- Click "Next"
- Select the folder you want to save your work to (I suggest Thawspace) and click "Next"
- Photo Story 3 will now build your movie file
Friday, May 16, 2014
Sweet Home 3D: Importing Floor Plans
Yesterday we finished working on our Sweet Home 3D house design. You should have taken several "photos" of your house and uploaded them to your portfolios. We also got grade printouts and corrected any errors or missing assignments that weren't uploaded.
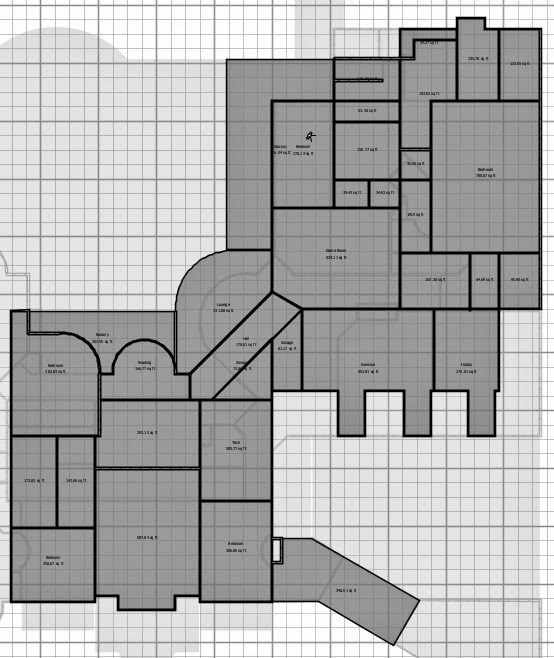
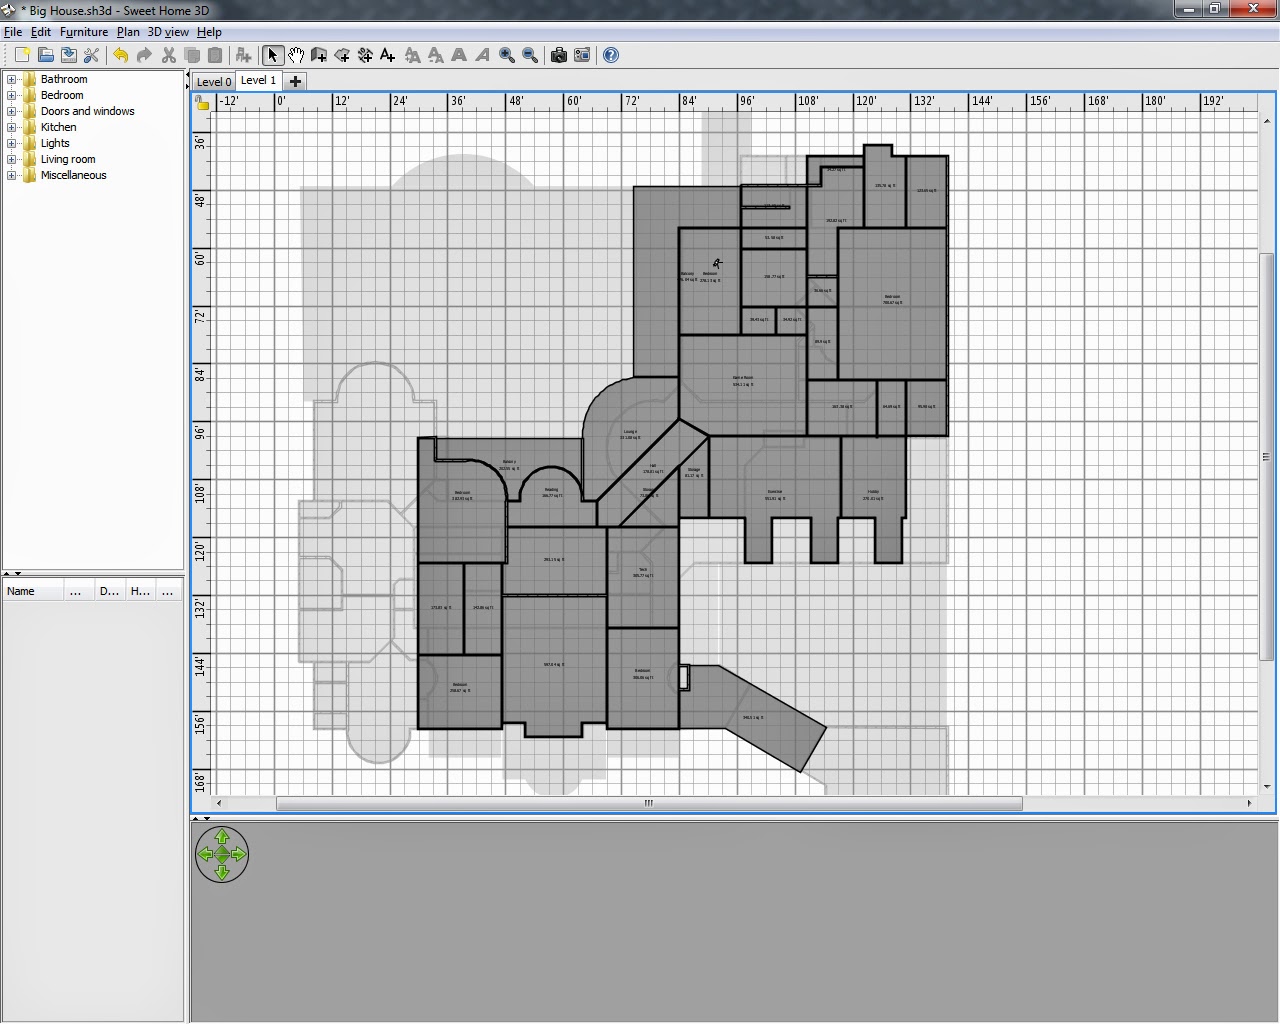
 Today we are going to continue using Sweet Home 3D, but we will be importing a pre-made floor plan. You can locate floor plans from a variety of locations on the web. One place to find nice plans is TheHouseDesigners.com -- a site which includes the ability to search for single stories, a certain number of bedrooms, etc. Another way to find plans is to do a Google Search. The important thing to remember is that you will need a plan with some measurements so we can correctly scale our models.
We will import the base floor plan, set the origin point [to the upper left], draw the walls, add doors and windows, and then decorate and furnish our house.
When finished, we will post the floor plan and "photos" of our completed model.
INSTRUCTIONS:
- Locate a floor plan with dimensions and save the image to your Thawspace
- Open Sweet Home 3D
- Go to PLAN > IMPORT BACKGROUND IMAGE... > CHOOSE IMAGE
- Select the image (floor plan) you saved in step 1
- If the image looks correct, click CONTINUE
- Adjust the blue line to span across a room with known dimensions (i.e. a room that is 10'6")
- Enter the number of inches your line represents (in the example 10'6" would be 126)
- When asked for the Origin Points just leave it at 0,0 and click CONTINUE
- Draw the walls as indicated on your floor plan
- Create rooms using the Room Tool
- Add windows and doors
- Add colors/textures to the walls, doors, windows, ground, sky, etc.
- Lock your "Base Plan" to prevent changes
- Furnish your house
- Make necessary adjustments (you may need to unlock the base plan)
- Begin creating "photos" of various locations / points of interest in your house
- Add your floor plan and photos of your house to your portfolio
Wednesday, May 14, 2014
Sweet Home 3D: Taking Photos
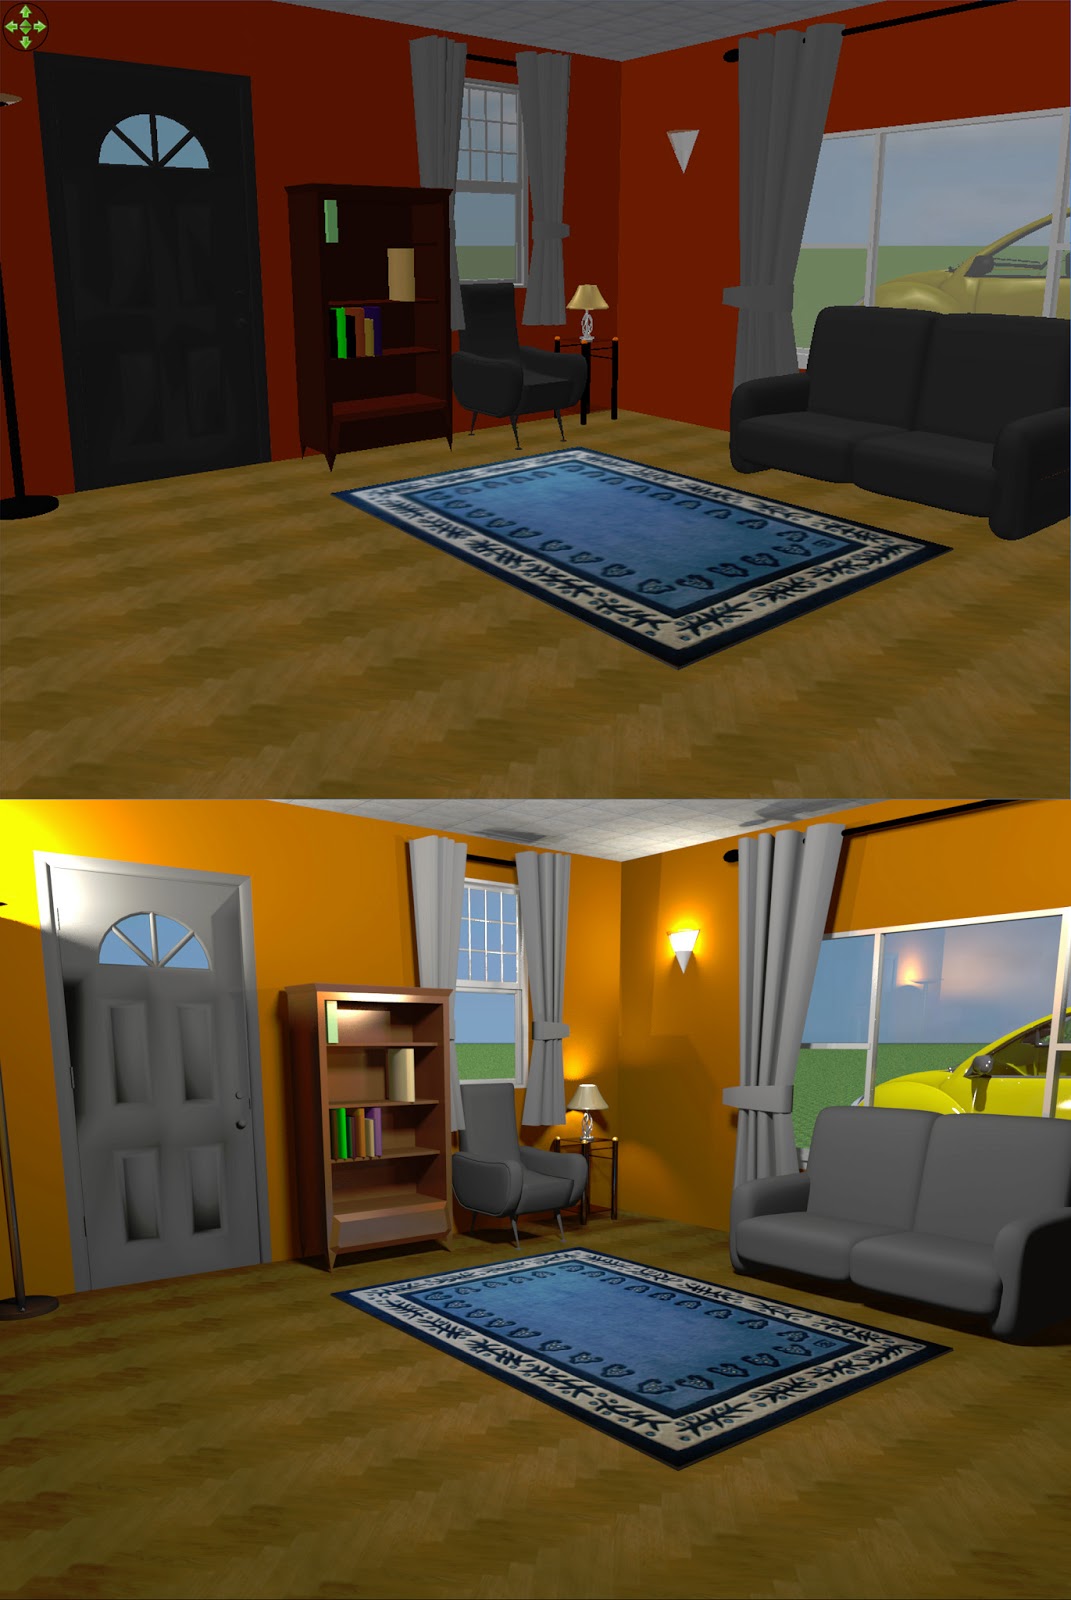
 Notice the examples (left) where you see the original in-app version and the rendered "photo" with lighting and shadows.
The scene shown here is created from the floor plan on the right.
Once you have created and saved some "photos" of different rooms in your house, you can upload them to your portfolio. I would like to see at least 4 different rooms in your examples.
 When you click the black camera button you will see a dialog similar to the following picture: Note that you should uncheck the "Proportions" box, change the size to 800 x 600, and select "Best" for quality
Finally, I would like you to take a screen shot of your floor plan. If you press the "Print Screen" key on your keyboard a snapshot of your computer screen will be saved to memory. You can then open Photoshop, do a FILE > NEW, and Paste. You will see something similar to the following images -- one is the original and one is cropped.
Monday, May 12, 2014
Homework: Virtual Yearbook Photographs

 Look for [school appropriate] opportunities to take some candid shots of [and with] your friends doing things you always want to remember.
  If you would like to record short video clips as well, there will be a chance to integrate those into your presentation as well, but the main focus for this project is utilizing the Rule of Thirds and capturing memories that you can take with you on your journey.
Sweet Home 3D: Design a House
I will be wanting you to create a floor plan with the following:
- Kitchen
- Bathroom
- Living Room
- Bedroom
- Closets
You will have today, tomorrow and Wednesday to complete your designs, then Thursday to take "pictures" of your rooms.
Friday, May 9, 2014
Sweet Home 3D: Design a House
 Today we will begin exploring features of Sweet Home 3D -- a free 3D home design program which does rendering, animation, etc. The program has an active developer community and a lot of extra models you can download for free.
Sweet Home 3D: http://www.sweethome3d.com
Sweet Home 3D Models: http://www.sweethome3d.com/importModels.jsp
 Our goal over the next couple of days is to design a house with at least one bedroom, a kitchen, a living room, and a bathroom. You are welcome to create additional bedrooms, a family room, a garage, a workshop, or whatever. Just have fun with it.
When you are finished, take some "photos" (renderings) of different rooms and/or angles to put on your portfolio.
Other web sites with 3D models
The following sites offer also some 3D models at OBJ, DAE, 3DS or LWS formats supported by the furniture import wizard of Sweet Home 3D:
Google 3D Warehouse (a big choice of models at DAE/Collada format) Resources.blogscopia (free well designed models shown also here) ArchiBit Generation (various well designed models) Flying architecture (various models with regular updates) Kinnarps (office furniture) Free the models (furniture tested in Sweet Home 3D) Kolo (bathroom furniture) Creative-3D.net (a lot of importable furniture, but monochrome) Klicker (a few chairs and trees) Model3D.biz (various models, but a few models can't be imported) Baumgarten Enterprises (a few interesting models, generally for industrial purpose) 3DPlants.com (a lot of plants but without colors, except for the Plant of the month)
OTHER USEFUL DOCUMENTATION:
Creating Sloped Roofs/Ceilings/Etc: http://www.sweethome3d.com/
Plug-Ins & Extentions (Haven't checked yet): http://www.sweethome3d.com/
This video tutorial does a pretty good job of showcasing the tools in Sweet Home 3D -- although it's a much earlier version:
Thursday, May 8, 2014
Working with External 3D Models
Believe it or not, there is a market for good 3D models. For example, an architect would like to showcase a living room and wants to place an unusual table in front of the couch -- or an artist may be creating a space scene and needs a decent spaceship. A hobbyist may just enjoy putting together full scenes but they may not have the ability to create individual pieces themselves. In cases such as these, customers will shop at online 3D shops.
One such shop is called TurboSquid (http://www.turbosquid.com/). I want you to create an account at Turbo Squid because we will be downloading some of their free models.
I would also like you to create an account on ShareCG.com (http://www.sharecg.com). This site has a lot of different pieces that you can buy, sell, share, or download.
Here are some other options for buying/selling 3D Models:
- Shapeways
- EverMotion
- CGTrader
- The3DStudio
- Renderosity
- 3D Ocean
- 3D Expert
- Creative Crash
- Falling Pixel
- Sculpteo
Here are the royalty rates, from best to worst:
- The 3D Studio - 60%
- 3D Exchange (tie) - 60%
- Creative Crash - 55%
- Renderosity - 50%
- Daz 3D - 50%
- Turbosquid - 40%
- Falling Pixel - 40%
- 3D Ocean - 33%
Wednesday, May 7, 2014
Rhino: Air or Space Craft
Today we will be using the "box modeling" process to create an air or space craft.

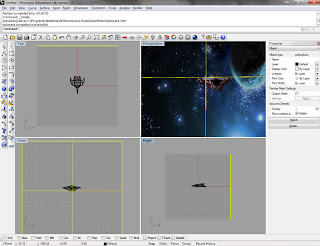

- Create a new Rhino document using "Large Object > Inches".
- Create the basic starting shape. In my example, I start with a box that is approximately the size of the air/space craft.
- Click "Explode" to break the box into individual surfaces.
- Type "Rebuild" and enter your preferred mesh settings (I do 8,8,3,3)
- Turn on Control Points (F10)
- Select Control Points and stretch your box shape into the shape you desire. I try to select points on the opposite side

Box has been pulled into a shape looking like an air/space craft.

Textures have been applied. I used a line to cut out a cockpit window and made it black and glossy.

I added a large, flat wall behind the spaceship and applied a texture to make it look like space.

I finish by positioning the scene, zooming in, rendering and saving the finished project.
Monday, May 5, 2014
Continue Room & Accessories
Continue laying out your room and creating furniture and/or accessories to decorate it. Get creative!
Friday, May 2, 2014
Rhino: Begin Room Layout
(You can click any of the images below to enlarge)

We begin this project by placing our floor. If your room is rectangular (as the example shows) it is pretty easy to plot it out. I started my room in coordinate 0,0, entered 144" (12 ft.) for the length and 120" (10 ft.) for the width -- and then specified 3" for the floor thickness.

Next I began adding walls by specifying the length, height (I did 96" for 8 foot ceilings), and the wall thickness (I did 3" -- but remember to add to your room length when adding walls)

Next I added the remaining walls. After you get two connected walls you can simply copy and paste to make new walls.

I remove one wall so I can see into the room easier -- similar to a dollhouse view. I also add a doorway and window opening by doing a boolean difference.

Next I began adding some details. In this case, a mattress and box springs (two boxes with filleted edges), and feet for the bed.

I continue adding details by adding "lofted" curtains (2 curves lofted together), a pillow, and a rug in front of the door. I am also in the process of adding a poster to the wall -- in this case just a box (.25 inches thick) with a texture I will apply next.

I add textures, lights, gloss, transparency, etc for my nearly finished scene.
Thursday, May 1, 2014
Rhino: Furniture, Objects and Decorations
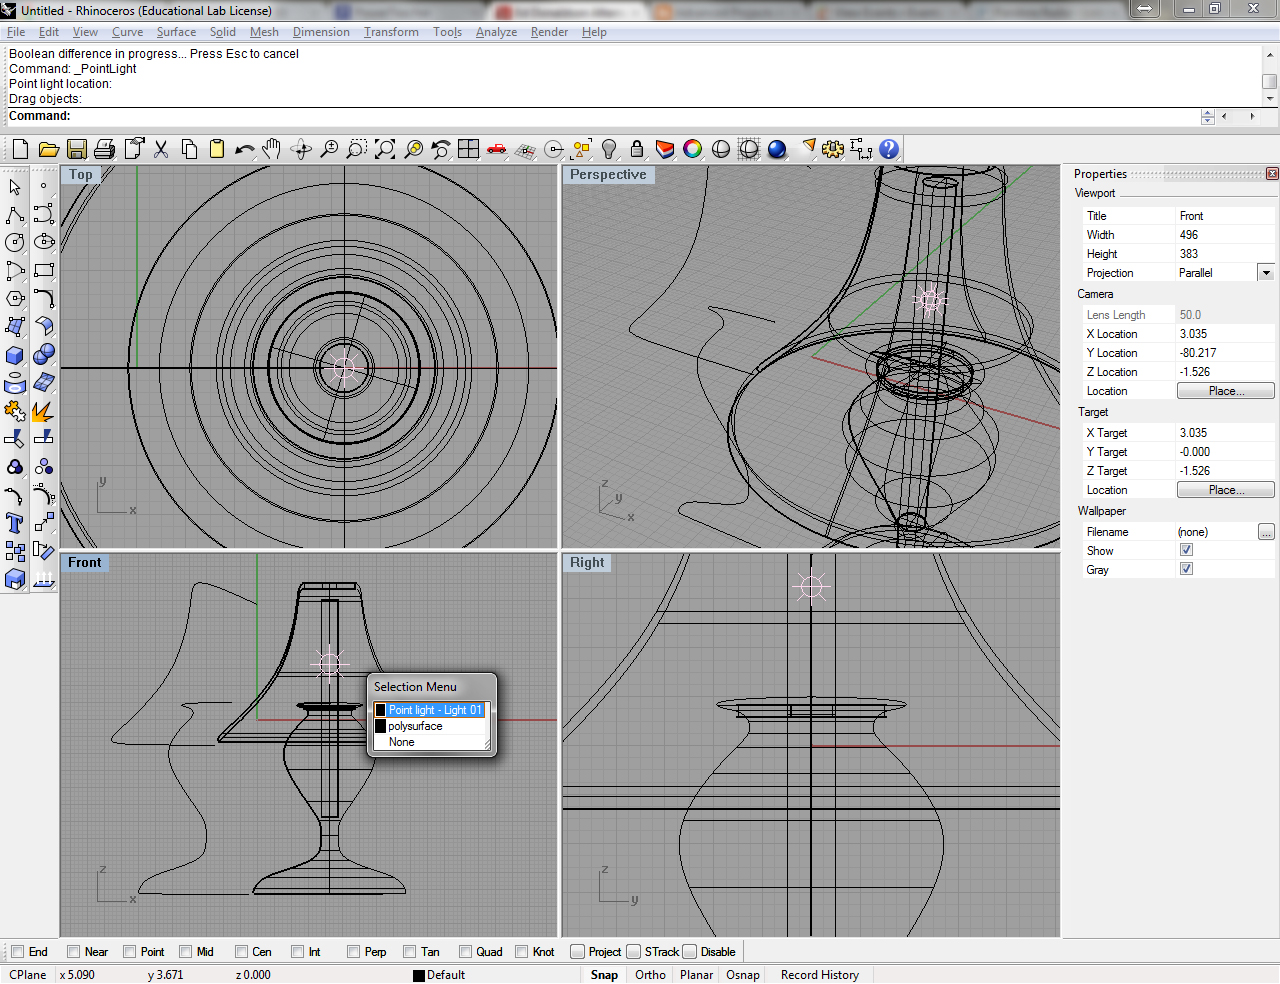 Adding items such as lamps can actually be very easy. For example, if you look at the diagram on the left, you will see that I drew two curves, revolved each of them, and added a light source for a quick and easy table lamp.
 There are a variety of different lamp shapes, lamp shade styles, etc. You can even create a variety of table lamps to save for future projects.
You may also want to play with desk lamps with flexible bases (see example below). Simply draw a curve and use the "Pipe" command to make the pipe.

 Other pieces that are fairly easy to build include furniture items such as desks or beds. If you do a search for "desk dimensions" or "bed dimensions" you can often find good diagrams (or even plans) for putting the pieces together.


 I am including a couple examples to get you started. Notice in the dresser design, that it consists of 10 boxes. You really just need a simple design to convey what the furniture is. Since we won't be opening the drawers of the dresser, we don't even need to hollow them out.
Subscribe to:
Posts (Atom)