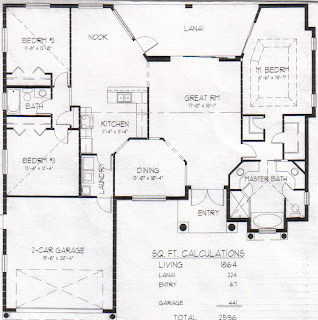
 Today we are going to continue using Sweet Home 3D, but we will be importing a pre-made floor plan. You can locate floor plans from a variety of locations on the web. One place to find nice plans is TheHouseDesigners.com -- a site which includes the ability to search for single stories, a certain number of bedrooms, etc. Another way to find plans is to do a Google Search. The important thing to remember is that you will need a plan with some measurements so we can correctly scale our models.
We will import the base floor plan, set the origin point [to the upper left], draw the walls, add doors and windows, and then decorate and furnish our house.
When finished, we will post the floor plan and "photos" of our completed model.
INSTRUCTIONS:
- Locate a floor plan with dimensions and save the image to your Thawspace
- Open Sweet Home 3D
- Go to PLAN > IMPORT BACKGROUND IMAGE... > CHOOSE IMAGE
- Select the image (floor plan) you saved in step 1
- If the image looks correct, click CONTINUE
- Adjust the blue line to span across a room with known dimensions (i.e. a room that is 10'6")
- Enter the number of inches your line represents (in the example 10'6" would be 126)
- When asked for the Origin Points just leave it at 0,0 and click CONTINUE
- Draw the walls as indicated on your floor plan
- Create rooms using the Room Tool
- Add windows and doors
- Add colors/textures to the walls, doors, windows, ground, sky, etc.
- Lock your "Base Plan" to prevent changes
- Furnish your house
- Make necessary adjustments (you may need to unlock the base plan)
- Begin creating "photos" of various locations / points of interest in your house
- Add your floor plan and photos of your house to your portfolio

Nice
ReplyDeleteWe are pleased by the details you have posted on your blog, and I have enjoyed reading this information for future reference. Contribute a great deal! Learn something about Floor Plan. Floor Plans & Home Plans
ReplyDelete